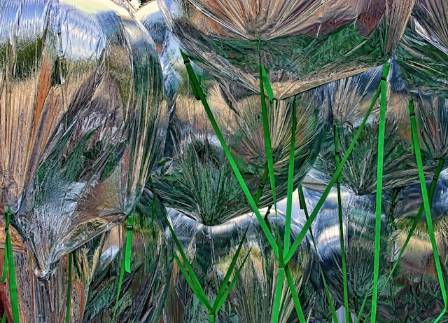
The art of subtractive sculpture involves the deliberate removal of material to reveal a hidden form within a solid block. When applied to landscape art, this technique allows for the creation of dramatic physical depth, mimicking the natural ridges, valleys, and textures of the earth. The primary objective is to manipulate positive and negative space to build a flowing, three-dimensional composition that remains visually engaging from every angle. Successful execution requires a balance of thoughtful carving and a refined final application of color to highlight the topographical features of your work.
Conceptual Research and Design Planning
Every landscape sculpture, regardless of how abstract it may appear, should find its roots in the natural world. Before touching your plaster, dedicated research is essential to inform the symbolism and shapes of your piece. One effective approach is to study the works of renowned abstract sculptors who focused on organic forms, such as Barbara Hepworth or Henry Moore. Observe how they used voids—holes carved through the material—to represent the interplay between land and sky. Consider whether your landscape will lean toward sharp, geometric structures or soft, rolling organic curves.
Another rich source of inspiration can be found in indigenous perspectives on the land. Research the spiritual significance that various cultures attribute to specific geographical features like mountains, rivers, or rock formations. Use these findings to imbue your work with personal meaning. In your sketchbook, document your inspiration by drawing and writing about the emotions or beliefs you wish to convey. It is vital to visualize the sculpture "in the round" by sketching it from the front, back, top, and sides to ensure the design remains interesting as a viewer moves around it.

Carving Techniques and Formative Development
Once your design is finalized and your plaster block is prepared, the subtractive process begins. Unlike additive methods where you build up volume, here you must think in reverse. Start by blocking out the largest masses of your landscape, gradually moving from broad strokes to intricate details. Use a variety of carving tools to create diverse textures—rough surfaces can represent craggy cliffs, while polished, smooth areas can signify tranquil water or wind-swept plains.
As you carve, constantly evaluate the relationship between the solid plaster and the empty spaces you create. These "negative spaces" are just as important as the physical form, as they guide the viewer's eye through the landscape. Pay close attention to the transitions between different elevations to ensure a sense of natural flow. Throughout this stage, document your progress through photography or notes. This not only tracks the evolution of your piece but also helps you plan the final aesthetic touches, such as the color palette, which should serve to enhance the shadows and highlights created by your carving.